
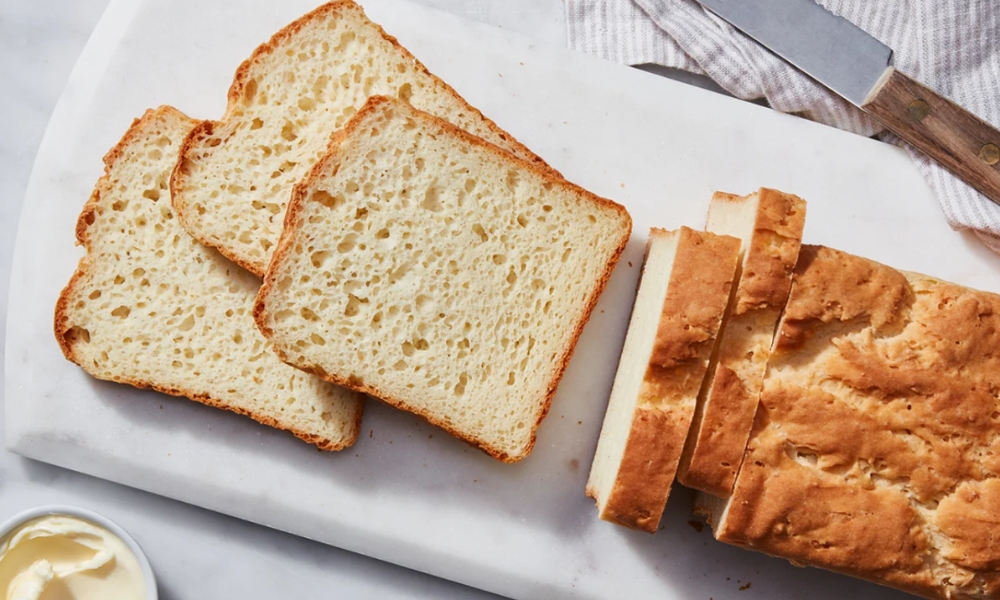
If you are looking for a soft and tasty loaf that works for everyday meals, then this Sourdough Sandwich Bread Recipe is perfect. It gives you a light crumb with a mild sourdough flavor that is not too tangy.
This bread is different from crusty loaves. It is soft and easy to slice, perfect for sandwiches, toast, or French toast. Baking it at home lets you control the ingredients and make it just the way you like.
Why Do People Love Sourdough Sandwich Bread?
People enjoy sourdough sandwich bread because it is soft yet full of flavor. It is easier to digest than regular bread and keeps fresh for longer. The mild sourdough taste makes it perfect for both sweet and savory meals which is why it has become a favorite in many homes.
- Soft and fluffy texture
- Mild sourdough flavor
- Easier to digest
- Stays fresh longer
- Works well for sandwiches and toast
How to Make Sourdough Sandwich Bread Recipe?
Ingredients You Will Need
| Ingredient | Measurement | Weight (grams) |
| Active sourdough starter (fed and bubbly) | 1 cup | 240g |
| Warm water | 1 ¼ cups | 300g |
| Bread flour (or all-purpose) | 3 ½ cups | 420g |
| Unsalted butter, softened | 2 tbsp | 28g |
| Sugar or honey | 2 tbsp | 25g |
| Salt | 1 ½ tsp | 9g |
Step-by-Step Recipe of Sourdough Sandwich Bread
Step 1: Mix the Dough
In a large bowl, mix starter, warm water, and sugar or honey. Add flour and salt. Stir until a coarse dough is created. Knead using hands or mixer some 8-10 min until smooth. Add butter, and knead together until it is completely mixed.
Step 2: Bulk Fermentation
Wrap the bowl and leave the dough to rise at room temperature 4-6 hours or until it doubles. This process gives the time to develop flavor and strength in the natural fermentation.
Step 3: Shape the Dough
Once doubled, gently deflate the dough. Roll it into a loaf and pour it into a loaf pan greased. Cover with a clean towel.
Step 4: Proofing
Let the dough rise for another 2–3 hours, or until it reaches just above the rim of the pan.
Step 5: Bake
Preheat the oven to 375°F (190°C). Bake the loaf between 35 and 40 minutes until it is golden brown and the internal temperature is approximately 190 o C (88 o C).
Step 6: Cool and Slice
Remove the loaf from the pan and place it on a rack until it cools completely. This helps set the crumb and prevents gumminess.
Read Also: 3 Ingredient Biscuit Recipe: Quick, Fluffy & Delicious
Nutrition (per slice, based on a 12-slice loaf)
- Calories ~170
- Carbohydrates 32 g
- Protein: 6 g
- Fat: 2 g
- Saturated Fat: 1 g
- Fibre: 1 g
- Sodium: 220 mg
Note: This is an estimate. Nutrition will change depending on flour type, fat or sweetener used, and loaf size.
Overall Experience with This Sourdough Sandwich Bread Recipe
If you compare this sourdough sandwich bread recipe with others online, here’s how it fares:
| Criterion | Rating | Notes |
| Flavour | Balanced sourness with sweetness (if you use honey) and rich taste, thanks to fat if included. | |
| Ease of making | Moderate | Requires time and attention, especially starter health and rise times. But the steps are straightforward |
| Versatility | Excellent | You can tweak hydration, flour type (mix whole wheat or white), and fat/sugar to suit preferences. |
| ingredient availability | Quite high | Only need starter, flour, water, salt; fat/sweetener optional extras, which many kitchens have |
| Time required | Longer than instant bread | Because of fermentation, but most of that time is passive. You can utilize overnight resting to spread out work |
If you follow this sourdough sandwich bread recipe closely, you’ll end up with a loaf that is delicious, functional, and satisfying. Tweak the flour or hydration to your climate, and you’ll get soft, flavourful slices every time, better than many store loaves.
How to Store Sourdough Sandwich Bread at Home?
Homemade bread is wonderful fresh out of the oven, but keeping it soft and tasty for several days takes a little care.
Unlike breads purchased from local stores, a sourdough sandwich bread recipe doesn’t contain preservatives, so storage matters. To keep the crust from getting soggy, wrap it in a towel or place it in a paper bag. Once cooled.
This storage method works if you’ll eat it within a couple of days. For longer storage, slice the loaf and freeze the pieces in a zip bag—this way, you can store it for a longer period to get the same taste. Avoid sealing fresh bread in plastic right away, since it can trap steam and make the crust rubbery.
If you like a softer crust, you can wrap it in plastic or foil after the first day. With the right storage, your loaf will taste bakery-fresh for days.
FAQs
1. Does this recipe require a sourdough starter?
Yes, the key is a healthy sourdough starter. And it is what causes the bread to rise and gives it that sweet tang.
2. Can I make it 100% whole wheat?
Yes, you can make it free-form into a bâtard or boule. However, a loaf pan will be good in case you want a sandwich bread shape that has even slices.
3. Can I bake without a loaf pan?
Yes, you can shape it free-form into a bâtard or boule. But if you want a true “sandwich bread” shape with even slices, a loaf pan is best.
4. How should sourdough sandwich bread be kept?
Once cooled, it should be refrigerated at room temperature within two to three days in the bread bag or fresh kitchen towel wrapped. Store in a freezer in a zip bag.
5. Why is the inside of my bread gummy?
They are normally due to the fact that the loaf had not been baked properly or its cooling was not done adequately before slicing. Always let it cool fully and check internal temp (around 200–205°F)
Conclusion
Making sourdough sandwich bread at home is simple and rewarding. The recipe gives you a soft and fluffy loaf that is still full of flavor but not too sour. It is perfect for everyday use whether you enjoy it as toast in the morning or as bread for your sandwiches.
The best thing is that you know it is prepared using natural ingredients and fresh in your kitchen. After baking it a couple of times you get used to it and you can hardly go back to store bought bread.